
Tying a bow from a ribbon can be difficult. Whether you’re using grosgrain, wire or silk ribbon, it can get crumpled, flattened or wrinkled. Save your presents by learning to tie the perfect bow! Step Below: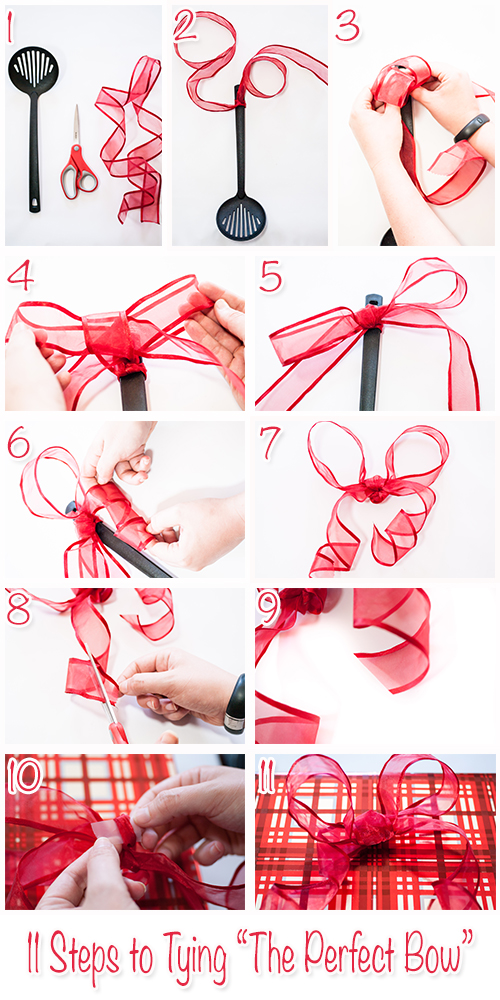
You’ll Need:
- Ribbon
- Scissors
- Large spoon or other kitchen utensil
Step 1:
Gather materials. It is better to have too much ribbon than too little. Keep it long and trim off what you don’t need.
Step 2:
Tie your ribbon around your large spoon. HINT: Keep one end longer than the other. This will prevent a lopsided bow when its all finished.
Step 3:
Start your bow. Loop the shorted end into an ear and use the longer end to wrap about the shorter end.
Step 4:
Pull the bow through. It won’t look very pretty immediately so don’t fret!
Step 5:
Make sure both your loops are even and the same size.
Step 6:
Curl the ends of your bows using your hands or scissors.
Step 7:
Make sure both bows and curls are even and same-sized.
Step 8:
Trim off the ends at a diagonal. This will create a professional looking bow!
Step 9:
Remove from spoon. There should be a large loop from where you tied the bow. Don’t tighten or remove this loop.
Step 10:
Tear off a small piece of tape and thread it through the loop. Then carefully stick it to your present or gift bag.
Step 11:
Tada! Take a step back and admire your handywork.


