
Sunny days are here, and that means its time to get outside and get some of those outdoor projects completed that have been patiently waiting for your attention all winter long. Maybe you’ve been putting outdoor projects off because you think it will eat up all your leisure time, but that doesn’t have to be true. How about some DIY outdoor projects the family can do together in an hour or less? That leaves plenty of time to have some fun! Here are a few ideas to get your creative juices flowing.

DIY Pest Control
Did you know that citronella candles are just regular candles scented with citronella oil? You can buy this oil at just about any hardware store, health food store, or online, and recycle glass jars, tin cans (as long as they’re not lined with plastic), or old candle holders. When buying citronella oil, make sure to get the essential oil, not the one you might find for fueling tiki torches. You’ll need a double boiler or two pots you can fashion into a double boiler to melt the wax, citronella oil, a wick, and something to use as a candle container. If you decide to use glass, warm the glass jar up in the oven on “low” before pouring the wax inside to help the wax cool evenly. Otherwise, the wax near the glass will cool faster than the wax in the center and the candle will sink in the middle. If you paint the container keep the paint to the outside, as painting the inside could cause it to catch fire.
Instructions
- Start by anchoring a wick to the bottom of each container using sturdy tape or hot glue.
- Once all the wicks are secure, put the jars in the oven set it to its lowest temperature and keep them there while the wax is melting in the double boiler on the stove top.
- Melt the wax in a double boiler (you can use a metal mixing bowl nestled atop a pot of boiling water if you don’t have a double boiler), until it is liquefied.
- Stir in the essential citronella oil, adding roughly three drops per cup of wax. For a colorful candle, gather up those broken crayons and add them to your wax. When adding color, remember that the cooled wax will be much paler than it appears in liquid form.
- Pour melted wax into warm jars and use pencils or leftover chopsticks to keep the wicks centered in the jar.
- Once cooled, trim the candle wicks to just half an inch or so from the surface of the candle. Light up and enjoy a mosquito-free zone!
Make a vertical garden
Here’s the fastest, simplest way to make vertical, or hanging, garden. If you have a balcony railing that gets some sun, you can hang it there.
- Grab an over-the-door canvas shoe organizer from the local dollar store, big box store, or even thrift store. It doesn’t have to be beautiful – it’s going to become weathered once it’s outside anyway.
- Check for drainage by pouring water into the shoe pockets. If they don’t drain well, make a few small holes in each pocket.
- Fill the individual shoe pockets with potting soil to 1” below the top and plant your favorite herbs in the shoe pouches.
- If you don’t have a spot to hang your herb garden, you can easily make one using a curtain rod or piece of pipe and sturdy hooks or curtain rod mounts.
- Add a trough planter below the hanging garden to catch the water runoff, and plant more herbs, flowers, or plants.
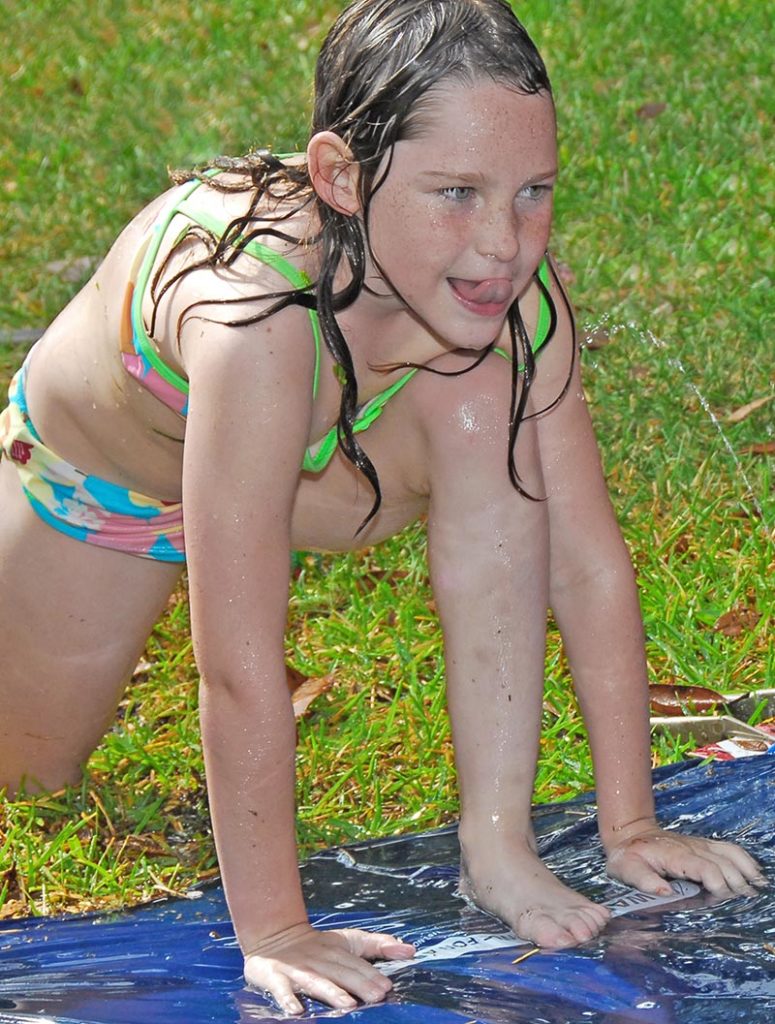
Make Water Blobs for the kiddos
What are water blobs, you ask? They’re the most fun your kids will have this summer! They are plastic sheeting filled with water (and maybe a toy shark or two for fun) your kids will love slipping and sliding on this summer, and they’re easy to make! You’ll need:
- Plastic sheeting at least 4mils thick
- Duct tape
- Blue food coloring
- Measuring tape
- Parchment paper
- An iron and ironing board
- Plastic toy fish, shark, etc.
Instructions:
- Measure out plastic sheeting for each child, allowing an extra few inches for height to make sure they don’t hang over the edge
- To seal the edge of the sheeting, place the parchment paper on top of the plastic
- Iron the parchment paper over the seam until the plastic edges melt together
- Be sure to leave an opening at one end to fill the pouch with your hose
- Add some blue food coloring, toy fishies or sharks, and a few plastic aquarium plants
- Use the duct tape to seal the opening once the blob is full of water (you can use this to seal any leaks or holes as they occur)
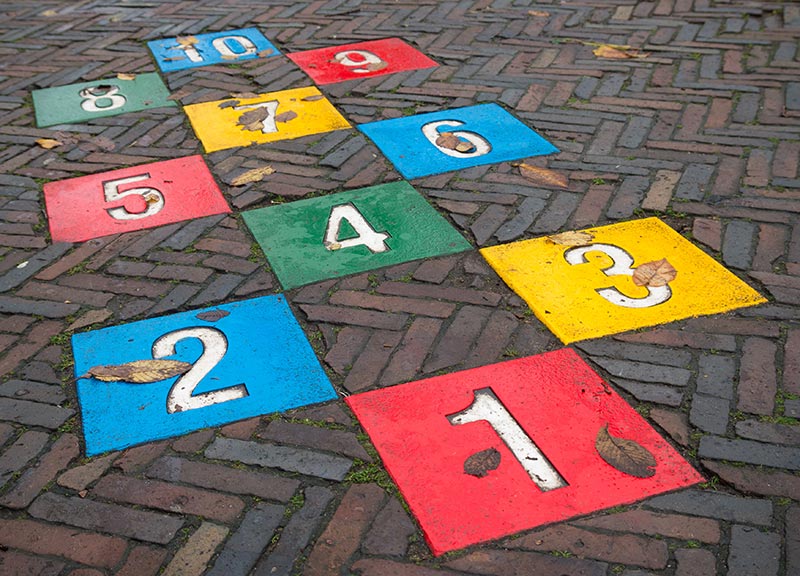
Make a Hopscotch Walkway
Why just have a walkway when you can have a rainbow hopscotch walkway instead? All you need are garden pavers, some paint and a little space. How about that side yard that never gets sed for anything? Perfect! Here’s how you do it:
- Collect 10 to 12 garden pavers
- Lay out your hopscotch pattern (usually 1,2,3 in a line, then 4 and five next to each other, 6, 7 and 8 together, 9 and 10 at the end) You might want to use two pavers for your “10”
- Paint your pavers different colors
- Add numbers in white paint once base paint is dry
- Place them in a hopscotch pattern on the grass and enjoy!
You don’t need a lot of time or effort to upgrade your outdoor living space, and these are all easy projects the kids can help you put together and the whole family can enjoy. You don’t have to spend a lot of time, effort, or money to put these fun outdoor projects together, but you’ll be able to enjoy them all summer long.


