
Fruit preserves are an age-old method of carrying the deliciousness of ripe summer fruit into the fall and winter months, when fresh fruit grown locally may be next to impossible to find. If you are fortunate enough to find ripe fruit in the dead of winter, it may be artificially ripened, and much more expensive than when fruit is in season.
With the rapid growth of the “earth to table” movement, many people are making the decision to either buy locally grown produce, or try their hand at raising their own fruits, vegetables, and herbs, even if they are not living in a rural setting.
Community gardens are a great way to produce your own fruits and vegetables, sharing the cost and tasks of upkeep with your neighbors. This offers a chance to get outside and get your hands dirty (in a good way!), experience a sense of accomplishment, and foster friendships with those in your community. If you are part of a large community, there may even be the opportunity to earn a little extra income by selling off excess produce at your local farmer’s market.
Preserving your favorite fruits can be a great way to enjoy their flavor and health benefits in the off season, without spending more than you should. Here are some tips for proper fruit preservation, to assist you in your efforts. First, there are three ways to preserve fruits (and vegetables):
- Canning
- Drying
- Freezing
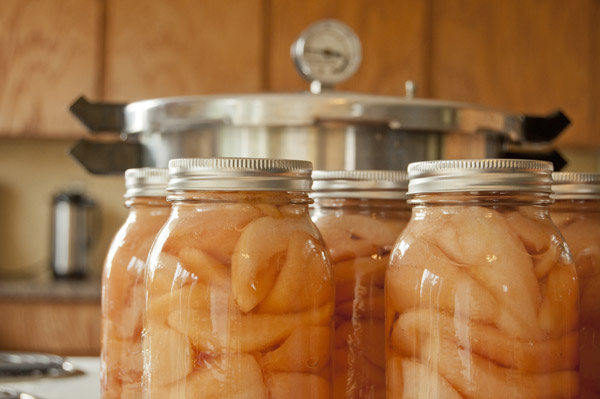
The most popular method of preserving fruits and vegetables is canning. Your mother or grandmother may have used this method of preservation to take advantage of her summer garden’s bounty. If you had the chance to observe this process, the following information might be familiar. Canning consists of placing fruit or vegetables in airtight containers (typically glass jars) to prevent the growth of bacteria and mold.

Here are five helpful tips to remember when using the canning method to preserve your fruits and vegetables.
- Choose fruit at the peak of ripeness. Whatever type of fruit you are preserving, the flavor and texture will hold up over time if you choose fruit that is perfectly ripe. Overripe or bruised fruit will not preserve well, and fruit that is not ripe will not become better by canning it. Hint: Fruit that is close to perfect ripeness may be hastened along by spending a day or two in a brown paper sack.
- Use a fruit-specific canning recipe. Different fruits have different properties, so it is a good idea to use a recipe specific to the type of fruit in order to get the best results for your canning efforts. Berries do not have the same properties as peaches or pears, for instance. Hint: Although the canning recipe you use will give you the correct amount of time to boil your glass jars to adequately heat the fruit, the higher your altitude, the longer processing time is required. Add five minutes for altitudes between 1,001 and 3,000 feet, 10 minutes for altitudes between 3,001 and 6,000 feet, 15 minutes for altitudes between 6,0001 and 8,000 feet, and 20 minutes for altitudes between 8,0001 and 10,000 feet.
- Make sure you have the right equipment. The canning method that works best for fruit involves placing the fruit in sterilized glass jars and heating them to a certain temperature. This is called water bath canning. When the jars are sealed, the canned fruit lasts many months. You will need a boiling water bath canner or a large, deep saucepot with a lid and a rack to keep the jars from touching the bottom, glass canning jars with new lids and bands, a jar lifter for removing the hot jars from the water bath. Hint: It is crucial to use a rack of some kind to prevent your glass jars from touching the bottom of the pot, which could cause overheating. If you don’t have a home canning rack, you can use a cake cooling rack or fashion a rack of your own by tying jar bands together with string and placing them on the bottom of the pot.
- Sterilize first. Glass jars must be sterilized before being filled with fruit, to start off clean and help prevent bacteria growth. This can be done either by using sterilizing tablets such as those used for babies’ bottles, immersing both jars and lids in boiling water, running them through a dishwasher cycle, or placing jars and lids in an oven on a low temperature for half an hour to 45 minutes. Any of these methods should kill all existing bacteria. Hint: Jars should be kept warm until filled with hot fruit and water; placing hot contents in a cold jar may cause it to crack.
- Check for airtight seals. Once you place your fruit in a sterilized glass jar, top it with boiling water, leaving an inch or so of space at the top of the jar. This will allow room for the fruit to expand. Run a spatula around the inside edge of the jar to remove any air bubbles, then close tightly with a threaded lid. Once the contents cool, a vacuum will exist that will preserve your fruit for many months, until the jar is opened. Hint: Lids will have a slight indentation in the center if your jars processed properly and a vacuum was created. If a lid is not bowed in, you did not achieve an airtight seal. This jar can be placed in the refrigerator once cooled, and the contents should be consumed within a week or two.
 We hope these tips will help you enjoy the fun and profitable process of canning fruit, and help you keep the taste of summer alive just a little while longer. If you want to put a personal touch to your canning endeavors, check out our canning labels and jar toppers.


